Seven

Novice Class
Posts: 69
|
 posted April 14, 2009 09:11 AM
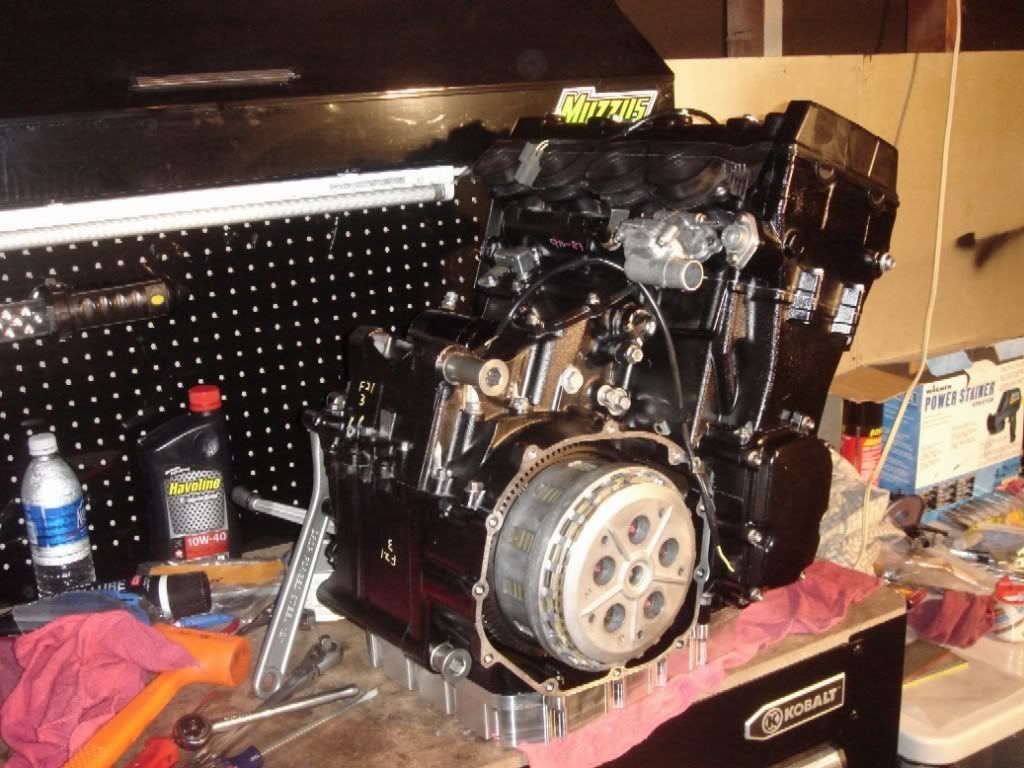
After i had the studs all finished i did a crush test to check the clearance between piston dome and head. Everything checked out with that so i did one final cleaning of the cylinder walls wiped them down with oil and closed her up for the last time (I hope). The biggest pain was when i got the top end all assembled, timed and tensioner set i went on to checking my valve clearances. When i took the head apart i marked everything so each valve went back in its spot with its own retainer and shim. Them i remembered i flipped the head during the disassembly process to look at the valves and had several caps and shims drop out. When i checked the clearances I had about 7 valves that were tight. Long story short i had to get into the whole game of moving schims around until i got the clearances right. I pulled each schim, measured and recorded it with its respective valve clearance. After coming up with a big table of measurements we were able to see what moves we needed to make to correct the problem. We only had to do this the one time and when everything came back together the clearances all fell back into spec. I can see why guys have trouble with this, very time intensive.
All finished

____________
project in the works!!! +4 mil stroker falicon rods CP pistons, APE valve springs, head studs, high pressure oil valve, muzzy HD oil pump plate, Adams performance 2" pan and Tsukigi sidewinder, lowered 2"
  
|
Seven
Novice Class
Posts: 69
|
posted April 14, 2009 09:18 AM
Once all the head was all done i pulled the waterpump cover off and filled the sump with oil. I wanted to make an effort to ensure the oil pump would pick up and prime the motor at the same time. When i installed the oil pump i packed it with some geased to help it pick up on startup. This helped and as soon as it started turing the water pump it began to chug-chug and before too long i had oil coming out oil ports so that make me feel a bit better. After all that i moved on to aux work getting startor cover on, timing sensor/cover, starter, valve cover, plugs and then finally the clutch assembly. The motor is not complete and maybe tonight ill be able to start getting it into the bike.
____________
project in the works!!! +4 mil stroker falicon rods CP pistons, APE valve springs, head studs, high pressure oil valve, muzzy HD oil pump plate, Adams performance 2" pan and Tsukigi sidewinder, lowered 2"
|
Seven
Novice Class
Posts: 69
|
posted April 14, 2009 09:22 AM
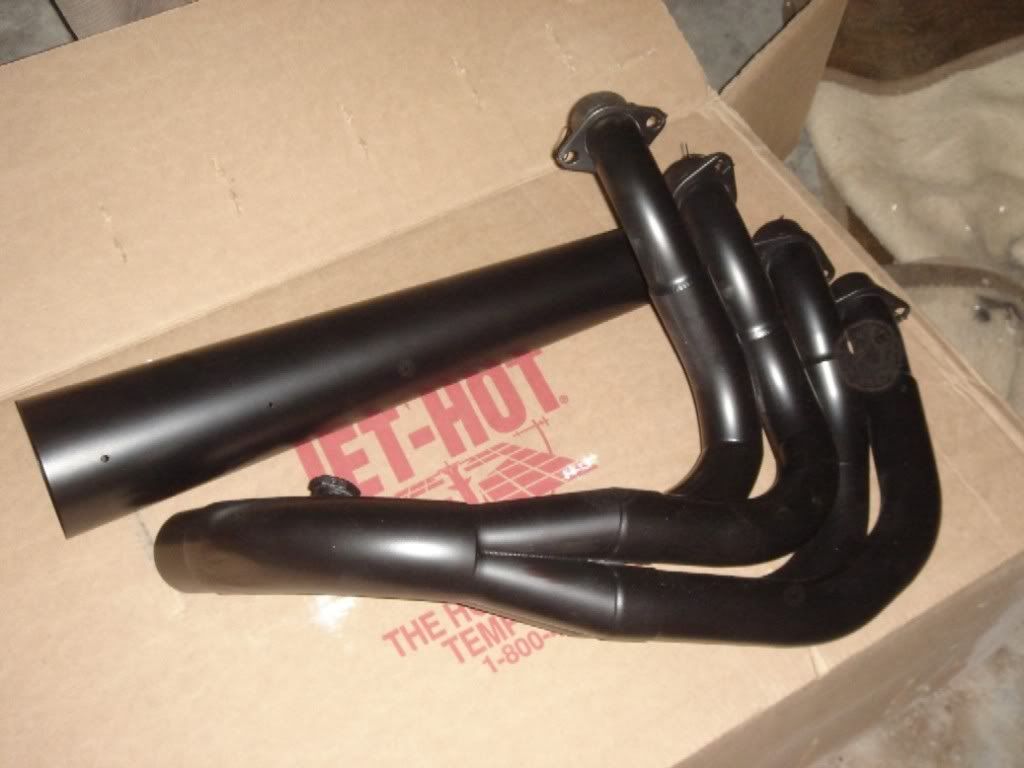
I got my exhaust back from the ceramic coating place in Oklahoma City on friday so I began to wrap the header section but havent finished that yet. I was wanting to get the weight of the exhaust before i wrapped it but forgot and now i already have 2 down tubes wrapped so its too late. just a little before and after pic Hope i can get it fired off on sat.

____________
project in the works!!! +4 mil stroker falicon rods CP pistons, APE valve springs, head studs, high pressure oil valve, muzzy HD oil pump plate, Adams performance 2" pan and Tsukigi sidewinder, lowered 2"
|
serius blk

Zone Head
Posts: 543
|
posted April 14, 2009 09:38 AM
how long did it take falicon to get your crank back to you
|
Seven
Novice Class
Posts: 69
|
posted April 14, 2009 09:55 AM
2 weeks including shipping
____________
project in the works!!! +4 mil stroker falicon rods CP pistons, APE valve springs, head studs, high pressure oil valve, muzzy HD oil pump plate, Adams performance 2" pan and Tsukigi sidewinder, lowered 2"
|
Swiftkart
Expert Class
Posts: 349
|
posted April 14, 2009 05:22 PM
I was wondering why you didn't go with the zx12 cam chain adjuster instead of the stock zx14 on your built engine?
____________
2006 ZX14, Brock CT-Meg, PC, ignition module, E85, 214 lbs suited, 8.96@152.32 1.46 60'
|
Seven
Novice Class
Posts: 69
|
posted April 14, 2009 07:20 PM
never delt with a 12 im guessing its just a manual tensioner?
____________
project in the works!!! +4 mil stroker falicon rods CP pistons, APE valve springs, head studs, high pressure oil valve, muzzy HD oil pump plate, Adams performance 2" pan and Tsukigi sidewinder, lowered 2"
|
Bawls
Needs a job
re-learning to ride
Posts: 2701
|
posted April 14, 2009 08:59 PM
Probably because there's nothing wrong with the 14's. If it's not broke don't fix it...
____________
Best 60ft: 1.42
Best 1/8th: 5.97
Best 1/8th MPH: 119
Brockland Police Badge # 001

|
Swiftkart
Expert Class
Posts: 349
|
posted April 15, 2009 05:38 AM
quote:
never delt with a 12 im guessing its just a manual tensioner?
No it's not manual, it's auto adjusting and lot more solid than the oil pressure operated zx14's which can fail once you start pushing the cc and hp envelop, some guys have had them mess up and some haven't, mine did so I switched it out, Carpenter and other top engine builders recommend the mod.
____________
2006 ZX14, Brock CT-Meg, PC, ignition module, E85, 214 lbs suited, 8.96@152.32 1.46 60'
|
serius blk
Zone Head
Posts: 543
|
posted April 15, 2009 10:06 AM
what all does it take to use the zx12 one. Ive heard you have to mod it. Is that true
|
Swiftkart
Expert Class
Posts: 349
|
posted April 16, 2009 06:17 AM
Take .120 off the mounting surface so it's the correct lenght for a 14, and that's it, my engine is much quieter now.
____________
2006 ZX14, Brock CT-Meg, PC, ignition module, E85, 214 lbs suited, 8.96@152.32 1.46 60'
|
Shane661

Needs a life
Posts: 11494
|
posted April 16, 2009 06:19 AM
Can you still weigh the exhaust, even with the wrapped tubes?
|
Seven
Novice Class
Posts: 69
|
posted April 16, 2009 08:52 AM
Ya deff ill try to do it tonight as im at the point where the exhaust is the next part to go on. Been puttin a few hours here and there and the motors all in and all connections hooked up. Exhaust, radiator, bat and tank are all i lack from turnin it over.
____________
project in the works!!! +4 mil stroker falicon rods CP pistons, APE valve springs, head studs, high pressure oil valve, muzzy HD oil pump plate, Adams performance 2" pan and Tsukigi sidewinder, lowered 2"
|
johnbull

Expert Class
Posts: 314
|
posted April 16, 2009 10:29 AM
Sounds good seven. Good luck with the finishing off bits and starting it up. Let us know how it goes as I'm getting very tempted to go for a stroker kit. I'm looking for tuning that will give more torque and smoother power delivery, which should be achieved by stroking.
____________
John Bul Racing. Malta.
|
Shane661
Needs a life
Posts: 11494
|
posted April 16, 2009 11:53 AM
quote:
Ya deff ill try to do it tonight as im at the point where the exhaust is the next part to go on. Been puttin a few hours here and there and the motors all in and all connections hooked up. Exhaust, radiator, bat and tank are all i lack from turnin it over.
Thanks, I appreciate it. I may go to a Sidewinder in the future so I'd like to get as much data as I can...
Shane
|
gilberjj

Needs a job
Friend of Fast
Posts: 3196
|
posted April 16, 2009 01:01 PM
 Edited By: gilberjj on 16 Apr 2009 21:09 Edited By: gilberjj on 16 Apr 2009 21:09
Shane..... I'm guessing you are going to go turbo at some time. Why don't you just take the plunge now and save yourself a LOT of time and money?
edit: whoops, I thought I was on shanes build thread..... sorry for the thread jack
|
Seven
Novice Class
Posts: 69
|
posted April 17, 2009 04:55 AM
Shanes Brocks exhaust
Here is how the weight breaks down, by my scale:
Assembled Header 5 lb. 15 oz.
Midpipe 5 oz.
Muffler with baffle 2 lb. 11 oz.
Springs 5 oz.
Tsukige sidewinder
header (#2,#3 tubes with about 6" of exhaust wrap each and 4 total SS ties) 6.95 lbs
Megaphone 2.47 lbs
1 spring .044 lbs
Total 9.464lbs = 9 pounds 7.4 oz and this is without a baffle
I wanted to see how it matched up against your Brocks so i took the time go look through your thread and see. I ordered a baffle about 5 weeks ago and still havent received it yet but ill throw that on the scale when i get it. Looks you may be taking 2 steps back with my system lol. I get time ill figure out how much exhaust wrap ive used so far and back that out of the total weight but its not much. On one of the other threads one of the guys was talking about how he didnt like his Tsukigi system because he couldnt run the times he did with the Muzzy system. I looked up some dyno charts of two Tsukigi systems one being a standard system and the other being my system heres the dyno charts

Just some food for thought. Low end of curve is weak but makes better power on the top end. But like the last guy said if it doesnt make your times better it doesnt matter what it puts down on a dyno. I wonder how much a baffle will help me out with this low end lag??? if any...
____________
project in the works!!! +4 mil stroker falicon rods CP pistons, APE valve springs, head studs, high pressure oil valve, muzzy HD oil pump plate, Adams performance 2" pan and Tsukigi sidewinder, lowered 2"
|
dubious

Needs a life
Needs more time to ride!
Posts: 8442
|
posted April 17, 2009 06:49 AM
Big primares tend to hurt bottom end.....all sidewinders are configured for top end power, not designed for anything but the drag racing sweet spot.
That drop in power below 4K is not so good for the street, as thats cruise rpm for most on the big bikes, but its a drag racing pipe....run it!
____________
natural selection.....
destiny will overcome intervention.
Some are not worthy of the effort.
|
Shane661
Needs a life
Posts: 11494
|
posted April 17, 2009 09:02 AM
Thanks, Seven. Depending on your launch rpm, that weak spot could make a big difference. But for LSR I like what I see...I'd like to see it compared to another pipe on the same dyno, though.
|
Smooth_G
Expert Class
Posts: 228
|
posted April 17, 2009 10:13 AM
thats cool,,bitchen lookin parts,,,many yrs ago i had falicon do the crank on a 1978 kz 1000,,i made it a 1428 cc the workmenship was really good,,,good luck with your build
|
Seven
Novice Class
Posts: 69
|
posted April 28, 2009 09:01 AM
I got the chance to spend some time last friday night to work on the bike. I started by finishing the exhaust because that was a PITA. Most of the down tubes have good clearance at the begining but then the tubes come together so you have to go from 1 tube to 2 and still trying to keep everything looking halfway nice. Its an easy process i think i make most of the pain myself tryin to make it look good even though itll be covered by plastic.

I then got the motor off my work bench and onto my bike lift. With this Adams pan it is so slick to put it on a stand slide it in place and land the bolts. The flat pan makes a good platform for any other work as soon as the motors in the bike as well. Just FYI when i filled the oil for the second time filter and all it was right around 5.5 qts.

____________
project in the works!!! +4 mil stroker falicon rods CP pistons, APE valve springs, head studs, high pressure oil valve, muzzy HD oil pump plate, Adams performance 2" pan and Tsukigi sidewinder, lowered 2"
|
Seven
Novice Class
Posts: 69
|
posted April 28, 2009 09:07 AM
After the motor was in and all torqued i started to install the exhaust and get all the other details taken care of. One thing just to let everyone know was that i was told i would have no clearance issues with my oil filter and my header and well by the pic you can tell thats not the case. I think theres a smaller filter out there or i may need to look into an adjustable filter relocator. to remove the filter now i have to pull the entire adams plate then screw the filter off takes a 2 sec process and turns it into a 10 min process.

After everything was done i was ready to give her a try. I didnt know what to expect!!! I rolled it a few times and then it fired. I was very glad to hear it come to life after all this time.

____________
project in the works!!! +4 mil stroker falicon rods CP pistons, APE valve springs, head studs, high pressure oil valve, muzzy HD oil pump plate, Adams performance 2" pan and Tsukigi sidewinder, lowered 2"
|
Compton

Zone Head
Posts: 969
|
posted April 28, 2009 09:26 AM
which filter are you using?
____________
b.w.
zx14, little longer, little louder, little lower.
08 Busa, just a little longer and louder and lower than the 14
|
gilberjj
Needs a job
Friend of Fast
Posts: 3196
|
posted April 28, 2009 09:34 AM
WOO HOO!!!! Now it's time for some tuning!
|
Silver08
Expert Class
Posts: 461
|
posted April 28, 2009 10:09 AM
would the exotic cycle filter relocator work for this to point to filter to the side?
____________
08 ZX14
|
|
|
 HOME
HOME NEW TOPIC