Rook

Pro
Posts: 1125
|
 posted July 27, 2011 09:34 PM
 Edited By: Rook on 28 Jul 2011 05:45 Edited By: Rook on 28 Jul 2011 05:45
Damn rook, you've taken on a challenge.
But i'm +1 on pulling the whole motor and working on the bench. It would be easier that way.
^^^I'm afraid to cut my rubber mat off the motor and I'm gonna pull the whole engine out?? Nope. No way. Not me. Next year, maybe--or next time there is major servicing to do (which i hope will not be sooner than next year). I will have to find or make a bench and also have some place to put it. Still wondering where I am going to put my busa since my buddy with the barn is getting divorced. I don't think his X will want the bike around----and I know I won't want me to be around her. brrrrrr yoikes. hope my buddy gets to keep his house.
  
|
Rook
Pro
Posts: 1125
|
posted July 29, 2011 06:13 PM
Edited By: Rook on 30 Jul 2011 03:20
I have throttle cables disconected from T boddies. Yeah those screws were tough. Had to use the old heat up the screwdriver with a torch trick.
removed ducts and idle speed screw cable.
disconected crankcase sensor wire connectors.

loosened up hoder clamp bolts under T-bodies,
There are a lot of wires on the T boddies over on the right hand side. Do any of those need to be disconnected ? Hate to find out there is wiring that needs to get pulled when I am pulling the T bodies out.
|
Rook
Pro
Posts: 1125
|
posted July 30, 2011 05:45 PM
Got the t bodies out. No problem with any unknown wire connections. I wish I could have cleaned the holders off before pulling the t bodies out. I saw a small crumb of this oily dust crud you see fall in and no doubt there could have been more. I see another crumb sitting inside the edge of the cloeset t body holder. I cleaned it all off carefully after t body removal of course.
What would you do about that stuff falling in? Will this be a problem?

|
1badzx12r
Needs a life
Posts: 8321
|
posted July 30, 2011 05:58 PM
lot of work just to get that rubber insulation off. and dust down the intake to boot.. just blow the intakes out and stuff rags in them
____________
http://www.youtube.com/watch?v=S06nIz4scvI
|
Rook
Pro
Posts: 1125
|
posted July 30, 2011 06:26 PM
Thanks. This is a speriment, too, don't forget. Good opportunity for me to remove and lube cables and clean out tbody bores they look pretty spotless. Injectors each have a small spot on them but holes are clean as far as I can tell.
 
Thanks for air blast suggestion. I like that. Prolly more for peace of mind than anything. I imagine that stuff will burn the first time I run the motor (I think it is pollen for the most part).....Now I will be buying an air compressor. I guess I could use one for tires anyway. Have to clean the motor off really good first and get rid of the damn dusty, heat blanket.
|
BlackMagic14

Needs a job
Posts: 2058
|
posted July 31, 2011 07:27 AM
Pull the secondaries while you have the TB's out
|
Rook
Pro
Posts: 1125
|
posted July 31, 2011 05:31 PM
Edited By: Rook on 1 Aug 2011 01:33
Have the secondaries gone for the last 3 years. Would have eliminated all the risk of pulling flies the normal way if I were to do them now. .but 1bad is right, this is quite a lot of work if you are going to do a relatively simple procedure. If t bodies are going to be removed for some other reason, the flyectomy becomes a snap.
Thanks for sticking with me on this 1bad. I'm sure you must be rolling your eyes and shaking your head a little bit.. Good learning experience but you are right. Taking the t bodies off? Not worth it to save the blanket. I'm looking at the other junk that sticks through the rubber on the motor and wondering if I might not end up cutting the blanket off after all. I'm not about to remove 1 more part.
Perhaps the take home lesson will be listen to those who have experience and save my big ideas for when I know what I am doing.
|
Rook
Pro
Posts: 1125
|
posted August 03, 2011 08:21 AM
Edited By: Rook on 3 Aug 2011 16:42
Just a hose and a few electrical connectors and some deft blanket rolling/stuffing maneuvers. yeah, that was pretty much work to save this thing. Putting it back on would be a pain too. Really, if a guy just unsnaped the connectors, the top of the blanket could have been pulled back to take the head cover off. I'm sure that is what a shop would do. I like having the mat gone though.

|
1badzx12r
Needs a life
Posts: 8321
|
posted August 03, 2011 09:27 AM
just rolling it back makes for a PITA for valve clearance checking and replacing shims .. but thats how a shop does it
____________
http://www.youtube.com/watch?v=S06nIz4scvI
|
Rook
Pro
Posts: 1125
|
posted August 03, 2011 12:19 PM
hey, 1bad--I am making pics with graphics for head cover removal......quick question:
The cylinders are usually referred to as 1,2,3 & 4. Which side of the bike is cylinder 1 on, sprocket side or rear brake side?
|
1badzx12r
Needs a life
Posts: 8321
|
posted August 03, 2011 01:10 PM
sprocket side is #1 and nearest cam chain is #4
____________
http://www.youtube.com/watch?v=S06nIz4scvI
|
Rook
Pro
Posts: 1125
|
posted August 03, 2011 04:49 PM
Edited By: Rook on 4 Aug 2011 01:21
i had it right. Well, thanks, 1bad.
|
Rook
Pro
Posts: 1125
|
posted August 05, 2011 11:55 AM
Edited By: Rook on 5 Aug 2011 19:57
Stick coils out and block off plates removed. I don't imagine there would be any harm if some small foreign particle fell down the reed valves?? I put a chunk of duct tape over each one just in case. No way that is going to stick to the reed valve itself. Those puppies are coated with a film of mushy soot now that the switch valve is removed.

|
Rook
Pro
Posts: 1125
|
posted August 08, 2011 07:38 PM
Edited By: Rook on 9 Aug 2011 03:42
Have removed head cover and removed timing cover also. Turned motor to TDC/timing marks.
The service manual says to position cylinders 1, 4 at TDC and then measure clearance between cam and lifter with a thickness gauge. Am I correct in assuming this means:
A. Find TDC for cyilinder #1. Then measure all four of the valves for cylinder #1 and the other valves (shown in solid black in the diagrams in the SM)
B. Next I will need to turn the engine to a different position to find TDC for cylinder #4. Then measure all valves for cylinder #4 and the other valves shown in solid black .
...IF SO,
Here are some pics of my cams. Maybe you can tell from this if I am positioned at TDC for cyl #1 or #4 (or neither). Remember, the timing wheel is also lined up to the marks as shown below.
TIMING WHEEL IS SET JUST LIKE THIS

CYLINDER #4 INTAKE AND EXHAUST CAM LOBES POINT INWARD AT ONE ANOTHER

CYLINDER #1 INTAKE AND EXHAUST CAM LOBES POINT AWAY FROM ONE ANOTHER

|
kaw now
Expert Class
Posts: 446
|
posted August 08, 2011 07:47 PM
I could be wrong but I think that the positions are more for convenience for the valves you can measure at each engine rotation. I measure the valves at any point on the base circle of the cam. In fact I measure throughout the base circle. If its a little close use the loosest place in the case of these valve types as looser is better because they get tighter as they wear.
|
kaw now
Expert Class
Posts: 446
|
posted August 08, 2011 07:50 PM
It looks like #1 is at TDC compression stroke because the next valve to open is the exhaust.
|
Rook
Pro
Posts: 1125
|
posted August 08, 2011 08:17 PM
I measure the valves at any point on the base circle of the cam. In fact I measure throughout the base circle.
I thought the clearance would be nothing when the cam lobe is down and pressing on the lifter-- If there was clearence at that point, the cam would not be lifting and the valve wouldnot move------or do iI have something really wrong?
Whatever the case may be, I will measure the valves for #1 as indicated in the SM diagram and try turning the motor and remeasure to see if I can figure out something about what you are speaking of.
|
wrongway
Pro
Posts: 1078
|
posted August 08, 2011 08:20 PM
I checked my street bike after 19k miles. I had 3 intakes at .005 , everything else was in spec. My 06 manual says check every 7500 miles ...but I think that is just to drum up business for the stealerships
Roy
|
1badzx12r
Needs a life
Posts: 8321
|
posted August 09, 2011 04:51 AM
quote:
The service manual says to position cylinders 1, 4 at TDC and then measure clearance between cam and lifter with a thickness gauge. Am I correct in assuming this means:
A. Find TDC for cyilinder #1. Then measure all four of the valves for cylinder #1 and the other valves (shown in solid black in the diagrams in the SM)
B. Next I will need to turn the engine to a different position to find TDC for cylinder #4. Then measure all valves for cylinder #4 and the other valves shown in solid black .
...IF SO,
Here are some pics of my cams. Maybe you can tell from this if I am positioned at TDC for cyl #1 or #4 (or neither). Remember, the timing wheel is also lined up to the marks as shown below
so far you are correct .. you are at TDC number 1 ..you will need to roll the timing wheel 360 to get #4 TDC ..Also note there is timing marks on the cams sprockets that line up for TDC to check the valves with..later that will be improtant if you got to pull the cams to remove a shim .. i can see the with paint on the cams both marks should be pointing to each other on the inside and level with the head .. when you roll it 360 they will be level with the head and pointing out ..
____________
http://www.youtube.com/watch?v=S06nIz4scvI
|
Rook
Pro
Posts: 1125
|
posted August 09, 2011 03:00 PM
^^Thanks everyone and thanks again, 1Bad. Yep, noticed the marks on the CC sprockets, though I didn't pay much attention to what they might mean. This is all sort of starting to make a little bit of sense.
Easy route would be simply measure the clearances for cyl #1 and turn 360 degrees from where I am at, measure rest of the clearances. If all in spec, bolt all back up. BUt, I have a hunch there will require some adjustments with the bike at 29,000 miles. Seemed to run better than ever after I gave it some hard track use but there must have been some ware. I don't want to do any more track riding until I know the valves are in spec.
|
Rook
Pro
Posts: 1125
|
posted August 11, 2011 08:37 AM
I took note of the timing marks on the CCsprockets when the motor was turned to #4 TDC. I will have to come back to that issue. For now, the next step seems to be ordering parts and tools.
shims
micrometer/caliper
new spark plugs
manometer & pilot screw adjuster if I have to do the Tbody sync again.
new head gasket
new spark plug hole gaskets
anything else?
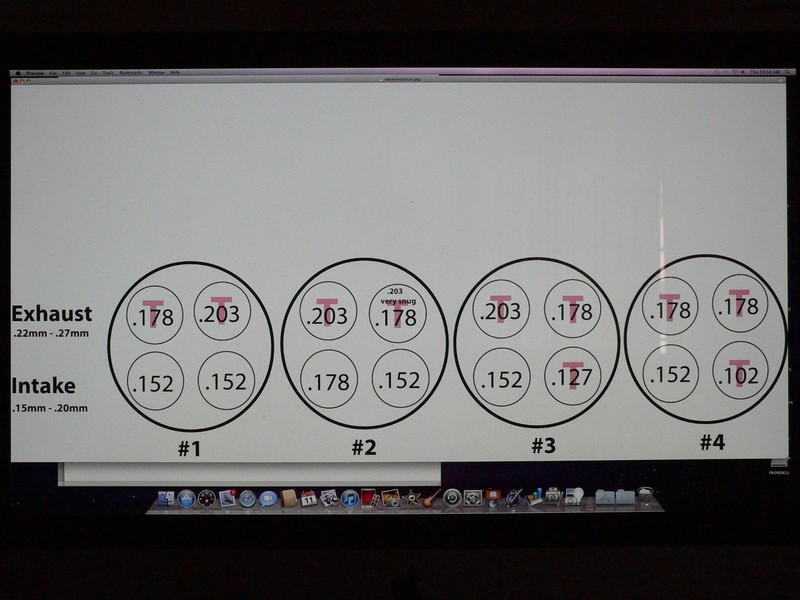
Here are my valve clearances ---I have checked and rechecked and rechecked again.
A. As you can see, the valves marked with pink T are all tight.
B. #2 right exhaust, the .203mm feeler fit but was very snug (tight- a little hard to get back out) so I decided I would accept the next smaller tap which is .178. Sound good?
C. Most of the exhaust valves are in spec but just by a hair----so can/should I go ahead and adjust them closer to the loose end of spec?
|
Rook
Pro
Posts: 1125
|
posted August 11, 2011 09:07 AM
Edited By: Rook on 11 Aug 2011 17:09
: )
|
1badzx12r
Needs a life
Posts: 8321
|
posted August 11, 2011 09:11 AM
quote:
: )
are you talking MM give me Standard readings like .005 to .008 intake and .008 to .011 exhaust
____________
http://www.youtube.com/watch?v=S06nIz4scvI
|
Rook
Pro
Posts: 1125
|
posted August 11, 2011 10:10 AM
Edited By: Rook on 11 Aug 2011 18:13
Sure. I have both standard and metric on my gauges. Here's a diagram in Standard.
Let me know if that is not large enough to read. This one shrunk a little but I think I can enlarge.

|
1badzx12r
Needs a life
Posts: 8321
|
posted August 11, 2011 10:39 AM
Edited By: 1badzx12r on 11 Aug 2011 18:42
.006 intake and .009 exhaust is perfect but sometime you have to settle on tighter or looser because you can't get it to shim out .001 with the aftermarket shims . so a .005 is good just as long as its not a .003 .... and you can try to make them 7's disappear on the exhaust and give them 9's ..
the stock KHI shims adjust .002 increments from what i'm told but i've always used the hot cams brand ..
really the only 1 i would adjust is the .004 intake and wait til next adjustment on the others
____________
http://www.youtube.com/watch?v=S06nIz4scvI
|
|
|
 HOME
HOME NEW TOPIC