CrotchRocket

Moderator
Bracket Racing with Betsy
Posts: 8038
|
 posted September 23, 2008 08:51 AM
Shane why did you take the fiberglass seat off???...It's lower, so you would be able to tuck under the windscreen more!!!
Good Luck at Maxton !!!
____________
Jason Miller StreetBike Seminars
*****DragRacers do it better, because they dont cut Corners*****
   
|
Shane661

Needs a life
Posts: 11494
|
posted September 23, 2008 09:03 AM
I'm not sure which seat I am going to run. I took the Catalyst off so I could work on a couple of things, and then the bike was a convenient spot to store the stocker! 
I have another stock seat that I might modify for lsr use...
Shane
|
Cajunboyz

Zone Head
Posts: 702
|
posted September 23, 2008 09:51 AM
Shane661 , The Kawasaki 16 tooth oem sprocket off of the old Zephyr 1100,What year Zephyr did it come off of & whats the Kaw pt# ???? I had lost it from previous. Thanks
____________
"Cajun Boyz with Bad Ass Toys"
|
Shane661
Needs a life
Posts: 11494
|
posted September 23, 2008 10:24 AM
quote:
Shane661 , The Kawasaki 16 tooth oem sprocket off of the old Zephyr 1100,What year Zephyr did it come off of & whats the Kaw pt# ???? I had lost it from previous. Thanks
I forget which year, here is the info:
Part # 13144-1317
Shane
|
Superman T

Pro
Posts: 1831
|
posted September 23, 2008 11:01 AM
quote:
quote:
Shane661 , The Kawasaki 16 tooth oem sprocket off of the old Zephyr 1100,What year Zephyr did it come off of & whats the Kaw pt# ???? I had lost it from previous. Thanks
I forget which year, here is the info:
Part # 13144-1317
Shane
Shane with most all of the members complaining about the aftermarket whinning on the 16 tooth, this is great info!! I know I will be purchasing this to match the 43 tooth in the back.
|
Shane661
Needs a life
Posts: 11494
|
posted September 23, 2008 11:22 AM
I can't take credit for the info, it was given out here:
http://www.bikeland.org/board/viewthread.php?FID=27&TID=41368
|
Shane661
Needs a life
Posts: 11494
|
posted September 23, 2008 01:18 PM
 Edited By: Shane661 on 23 Sep 2008 21:21 Edited By: Shane661 on 23 Sep 2008 21:21
Ok, progress. I started by cleaning everything up. The oil pan, the underside of the motor, everything. I used a cotton cloth with some WD40. Since the pan was off repeatedly, I wanted to get any dust or debris that might have settled in the engine. Here are a couple of picture of the view from underneath:


Oil pan cleaned up and ready to go:

Oil pipe and screen installed:

As you can see, everything is nice and clean. I used light grease on the o-rings for an easy seal. The oil pan installed fairly easily, but there are several brackets to install and the orientation can be confusing. Installed with filter:

New exhaust gaskets again. I could try to re-use the old ones, but it really is a pain if they don't seal and you have to drop the exhaust again!

Exhaust fitted in place:

I'm taking a break. I want to give myself time to think of anything I may have missed. I also need to investigate the best way to get oil pressure established (get rid of the air!) before actually starting the motor. All the passageways are dry from the procedure. I did fill the filter with oil, but that is just a small part of the system.
I still have the clutch and hub to install. I also need to get the wheels on the bike before I run it. I don't feel comfortable running it on the stands.
Shane
|
Shane661
Needs a life
Posts: 11494
|
posted September 23, 2008 04:27 PM
Edited By: Shane661 on 24 Sep 2008 00:36
Ok, back at it. The first thing I needed to do was install the wheels. I decided to go with a 42T rear sprocket. Striclty from gearing charts, the gear would seem to be good for around 192 mph. But in practice you won't see that. I'm figuring it to be good for 186-187 mph when used in conjuction with a 16T countershaft sprocket. This would be in line with what I saw on the 12R. Gearing charts are fun, but not always 100% accurate.
In mounting the front tire, I was interested in whether there would be enough clearance with my lowered Catalyst front fender. There is just enough:
Leading edge:

Trailing edge:

Next I moved to installing the new clutch hub. I was a little worried about marring the new one, but I had a new tool to try:

Gixx1300r sent me one of his clutch hub holders to try. It worked fantastic. I used a cheater bar on the handle when I tightened the hub nut to 100 ft. lbs....and it didn't leave a scratch on the hub. A little WD40 on the hub will help the tool slide on with ease. I wish I had spent $35 on one of these tools to begin with.
Well, thats it for today. Tomorrow morning I will install the clutch, fill it with oil, and fire it up!

Shane
|
Gixx1300R
Expert Class
Posts: 218
|
posted September 23, 2008 05:08 PM
Edited By: Gixx1300R on 24 Sep 2008 01:19
Glad you liked the Clutch Hub holder. Just a little info,the 99-07 Hayabusa and the ZX14 use the same size clutch plates. I dont know what the 14 clutches cost but you can get a full set of Hayabusa clutches for around $140.00. I'm sure the stack height may be different but you can mix the plates to get the correct height
|
Shane661
Needs a life
Posts: 11494
|
posted September 24, 2008 09:53 AM
I slept in this morning and got a late start. First thing up was the clutch. I cleaned out a drain pain and poured in about 2 quarts of fresh Honda dino oil to soak the friction plates before installation:

Some people prefer to soak them for "X" amount of time. I just throw them in the oil while I am prepping for the rest of the job. Meaning, getting tools together, cleaning and greasing parts, etc.. In this case, I cleaned the brand new steels with Brakleen as they were pretty dirty:

Clean and ready to go:

When installing the frictions, there is one edge that is colored:

All of the plates should be aligned with the colored "tab" in the same location on the hub. Since it is easy to lose track of where you are placing them, I placed a mark on the basket for reference:

As crazy as it sounds, I can't remember the exact reason they must be aligned. Perhaps it was something to do with the manufacturing process? I've been told like 10 times, but I can never remember!
Along the way I somehow managed to stack two steel plates, omitting a friction between them. That's when these tools came in handy:

One end of the tool is a pick, which makes removing the frictions a breeze. The other end is a strong magnet for extracting the steels. I can't stress how easy this makes the job! They are available from Schnitz for around $26. Crotchrocket loaned me his at the last Jason Miller Seminar, and I knew then I would be getting a set.
All the plates installed and ready to go:

Afterwards I installed the springs and closed it up. I have a lot of testing I want to do on springs, and a lengthy post, but it will have to wait for awhile. I just don't have time to do it right now.
Shane
|
Shane661
Needs a life
Posts: 11494
|
posted September 24, 2008 05:35 PM
I finally got the bike on the road this afternoon. So far, so good. I set the speedo healer to something ridiculous...80 mph shows about 30 right now. Good enough to keep me off of the speed limiter with my lower gearing, for sure.
There were a million little things to do, but since yesterday I have done the following:
Remove and remount wheels with new tires installed
Changed rear sprocket
Clean and install oil pan and associated parts
Replace oil and filter
Re-install exhaust with new gaskets
Install new clutch hub and clutch
Lube and adjust chain
Install fairings and trim
Cut & modify lower to clear clutch cover
The last item was unexpected. I have not been running any lower fairings and didn't consider that I would need to cut one for clearance of the billet clutch cover. Here is that project, in pictures:


It came out pretty decent. Of course if I had another to do, I could do an even better job. But this is more than good enough and doesn't look too bad, either. Speaking of which, it is nice to see the bike with bodywork for the first time since early July! I'm going to clean it up tomorrow and hopefully get a few pictures.
Shane
|
Shane661
Needs a life
Posts: 11494
|
posted September 24, 2008 07:38 PM
Edited By: Shane661 on 25 Sep 2008 03:39
One final shot before bed. Its cleaning up nicely and starting to look like a bike again:

And that's it for tonight.
Shane
|
Shane661
Needs a life
Posts: 11494
|
posted September 25, 2008 05:47 AM
Edited By: Shane661 on 25 Sep 2008 16:34
Got it out and cleaned up a little. It's come a long way since I started:
Here it is, on 7/4/08:
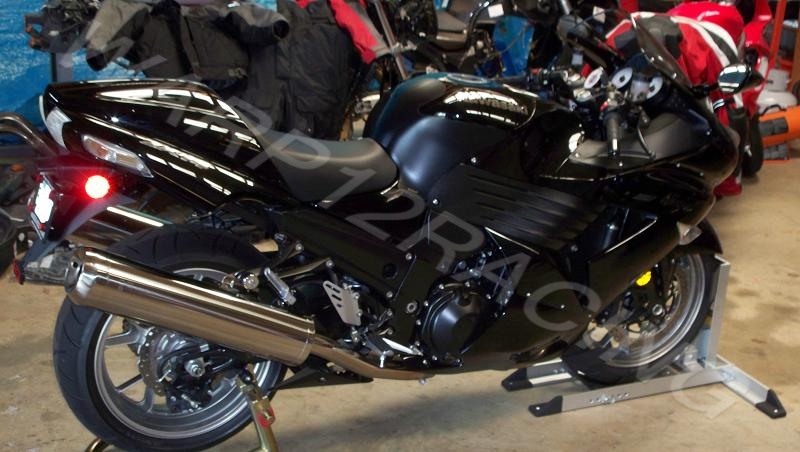
This morning:


I have a few more safety related items to do before it is ready for Maxton; I will try to get to them today.
Shane
|
Superman T
Pro
Posts: 1831
|
posted September 25, 2008 08:20 AM
Very nice Shane! You know if you keep theses threads and you ever want to sell the bike, this will prove to the potential buyer on the bike upgrades and the workman ship behind it!! Kudos for sharing such detailed events....
|
wrenchhead

Novice Class
Posts: 76
|
posted September 25, 2008 10:42 AM
good luck at maxton let us know some numbers when you get back.....
|
Shane661
Needs a life
Posts: 11494
|
posted September 25, 2008 11:13 AM
Edited By: Shane661 on 25 Sep 2008 19:32
I really don't know what to expect from it at Maxton. I don't have a whole lot of top-end experience....maybe about 25 official passes north of 175 mph. My 12R was good for 181.x with me on it, fairly consistent. On the same day, my girlfriend went 193. She was about 100 lbs. lighter than me (suited) at the time, and much more aero friendly.
I think the hp is about equal at peak to my 12, based on 1/4 mile trap speeds.
We'll see how it goes. I'm just out to have a good time. 
Shane
|
Shane661
Needs a life
Posts: 11494
|
posted September 28, 2008 01:03 PM
Edited By: Shane661 on 28 Sep 2008 21:08
The racing weekend is finished here at Maxton. The details of that event, and the impact on the community, will be chronicled in numerous threads on the various boards. I am going to refrain from expanding on the event in this thread. May Dave Owen rest in peace. He will be missed.
Due to track events, I was somewhat limited in my number of runs. In fact, I made my only passes on Sunday. I made a total of 3 passes, and to be honest, I was not riding well.
Here is the bike at the track:

First pass, missed 2-3 shift and 4-5 shift:

Second pass, missed 2-3 shift and 4-5 shift:

Third pass, slow and deliberate shifting:

I am very happy with the performance of the bike. It was not even remotely set up for the mile. I was running over 65" of wheelbase by the time I had my gearing set. I still had a few hundred rpm left, running 16/41 gearing. My goal is to see 190 mph on the motor at the next Maxton event.
So, a good performance by the bike. Perfectly stable at speed, and very forgiving to my riding errors when compared to my ZX-12. I also ran better mph than I ran on my 12R. Now if I can get my riding together, I'll be on to something!
Shane
|
Cajunboyz
Zone Head
Posts: 702
|
posted September 28, 2008 02:07 PM
As your top mph increased each run, DID you do any tuning to achieve that??(like riching it up on top??)
____________
"Cajun Boyz with Bad Ass Toys"
|
Shane661
Needs a life
Posts: 11494
|
posted September 28, 2008 02:24 PM
Edited By: Shane661 on 28 Sep 2008 22:24
No tuning at all. I didn't even log a/f on the runs....so there is likely more to be had there.
After the first run I changed the gearing from 16/42 to 16/41. It seemed very apparent that I was going to hit the limiter if I had a clean run since I ran through the traps at about 11300 rpm indicated. Other than that one change in gearing, the bike was the same for all passes.
These were just a few "test" passes. I am sure I will get quite a bit more out of it. I think that even with no further changes I can still get a couple of mph more.
Shane
|
Cajunboyz
Zone Head
Posts: 702
|
posted September 28, 2008 03:08 PM
Shane PM me when you lookat your data logger.
____________
"Cajun Boyz with Bad Ass Toys"
|
Shane661
Needs a life
Posts: 11494
|
posted September 28, 2008 03:24 PM
Edited By: Shane661 on 28 Sep 2008 23:30
I didn't have it logging data today. I was hoping to get some logs, but it didn't work out this weekend. I will get some next Friday at the dragstrip.
I was running about 13.1-13.2:1 when I checked it last. I have enrichened it 1% since then, but have not logged it again. I figured it was in the ballpark with me running 117-118 mph in the 1/8th mile at 230 lbs. suited.
Shane
|
KZScott

Needs a life
high on speed
Posts: 7235
|
posted September 28, 2008 04:29 PM
kinda lean isnt it? imo i would shoot for 12.6: 1 to 12.8:1 afr
____________
01 ZX-12R 8.84 @ 156.3 no bars, DOT tires. Pump Gas, NA.... turbo 8.47 @ 164.
00 ZX-12R 8.62 @ 165.2 no bars, slicks, Pump Gas, 55 shot.... turbo 8.32 @173
00 ZX-12R Fastest NA Kawasaki in the world 1: 222.046 1.5: 226.390 Loring AFB
00 ZX-12R street turbo 1: 227.9 1.5: 234.1 Loring AFB
00 ZX-12R LSR turbo 1: 263.1 1.5: 266.5 Loring AFB Worlds fastest ZX-12R
CMG Racing RCC Turbos
|
Shane661
Needs a life
Posts: 11494
|
posted September 28, 2008 04:34 PM
Initially the map was running at 12.4:1. I leaned it out 3% which leaned it to 13.1-13.2:1. I have given it 1% more fuel since then, but not logged it yet.
Shane
|
Shane661
Needs a life
Posts: 11494
|
posted October 01, 2008 04:49 PM
Edited By: Shane661 on 2 Oct 2008 00:50
Ok, back to work on the bike. I have been sitting on this air shifter kit for awhile. It's time I got it on the bike because I am missing way too many shifts. Whether it is the new trans or me, I'm tired of wasting runs!
The kit I bought is from Cycle-Tek. Matt offers great kits at great prices with excellent tech support. In this case I am going to be mixing and matching some pieces from the 14 and Busa kits. My installation is a little different since I am using Muzzy cylinder mounting and I want to mount the CO2 tank under the Catalyst seat. I also want to relocate the solenoid.
I am using the shorter ram cylinder from the Busa kit:

This is required because the lower Muzzy mount bolts to the shifter. Normally you would drill a hole through the shifter itself for the lower mount. I am not overly fond of that mounting, so I am using the Muzzy part:


The upper mount replaces the nut on the end of the upper rear engine mounting bolt:


When you install the upper mount you will need to re-torque the engine mounting bolt and collar. Be careful not to allow the collar to rotate and put too much force on the frame. The new spec for the collar is 11 ft. lbs. :


Here is the ram cylinder test-fitted with the Muzzy mounts:

That's as far as I'm going to get tonight. Tomorrow morning I will try to tackle the rest. I would like to get this working tomorrow so that I can use it at the dragstrip on Friday.
Shane
|
Shane661
Needs a life
Posts: 11494
|
posted October 02, 2008 12:46 PM
Edited By: Shane661 on 2 Oct 2008 20:49
I started on the remaining work this morning. First I had to remove the body panels and lift the tank so that I could get to the battery compartment:

The battery compartment can be seen here, under the tank:

I mounted the solenoid to the inside of the plastic panel that covers the battery area:

Here you can see that it is a tight fit, as I close it up:

The air lines are run through some holes in the frame. I recommend putting grommets in the holes or some rubber hose over the air lines. Otherwise they might get some holes rubbed through the lines.
Cylinder finished, with CO2 line installed:

Here is the pre-made wiring harness included with the kit:

It is a pretty nice harness and works as-is. I installed the kill box under the seat. You can also see where I tapped into the coil wires:

I decided to use the included external mounting for the CO2 tank. It attaches to the passenger peg bracket. I used a dremel to grind away a small amount of material so that the bracket would fit easily. I also safety wired the bottle bracket to the footpeg mount, just in case the mounting screw were to back out:

The final kit, mounted and ready to use:

I took it out for a test drive and it worked like a charm. Actually I'm pretty thrilled with it! I can't wait to try it at the track tomorrow.
I also installed a larger rear sprocket, since I had the 41T on from Maxton. Right now my gearing is at 16/45. I am taking a 43T with me to the track as well. In addition, I swapped back to my Shinko U-Soft tire in the rear.
Well, that's about it for now. I need to finish installing the bodywork and check a few things to make sure it's track-ready.
Shane
|
|
|
 HOME
HOME NEW TOPIC