AcadianaZX

Advertiser
Posts: 530
|
 posted September 12, 2009 06:33 PM
quote:
quote:
Bikes looking good Shane. Good info! Thanks for all your work on this thread.
Thanks. How about some pics of your bike with that Muzzy swingarm!! 
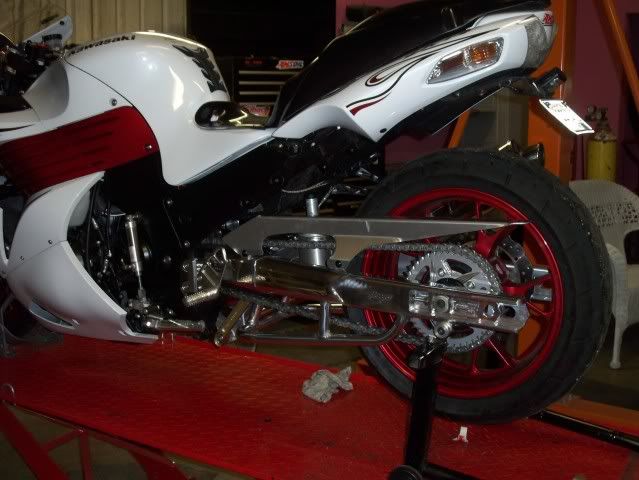
Hey Shane, Tressie surprised me with yet another part on my list of upgrades. She ordered the unpolished swingarm but the polished one is all they had and Muzzy didn't charge us the extra cost of 150. It cost 995 with my stock one sent in for a core charge. It's the 64"-68". I'm not sure about keeping it like it is but that gets me much closer to powder coating if I decide the go black. Let me know what you think. If I keep it polished, I think I'll add some polishes rims to my list. My wheel base is still at 63". I'll keep it there till I make improvements on my launch.


James
  
|
dubious

Needs a life
Needs more time to ride!
Posts: 8442
|
 posted September 12, 2009 08:39 PM
James, did you weigh that arm?
____________
natural selection.....
destiny will overcome intervention.
Some are not worthy of the effort.
|
Shane661

Needs a life
Posts: 11494
|
posted September 13, 2009 03:37 AM
Looks great James!!
|
AcadianaZX
Advertiser
Posts: 530
|
posted September 13, 2009 06:27 AM
 Edited By: AcadianaZX on 13 Sep 2009 15:42 Edited By: AcadianaZX on 13 Sep 2009 15:42
Sorry Lyle, I sure didn't. If I decide to powder coat it, I'll get the weight next time and post it.
And thanks Shane!
|
ZuminaZX

Expert Class
Posts: 128
|
posted September 13, 2009 02:57 PM
Hey Shane, great work. One has to wonder what exactly you do for a living having seen how much time/money you've poured into your bike this year. How did those CF clip-ons work out for you?
|
Shane661
Needs a life
Posts: 11494
|
posted September 13, 2009 03:06 PM
quote:
Hey Shane, great work. One has to wonder what exactly you do for a living having seen how much time/money you've poured into your bike this year. How did those CF clip-ons work out for you?
I haven't mounted the clip-ons yet. The bar clamps are pretty tall, and I'm not sure that I am going to use the supplied ones.
Aside from the wheels, I would say that most of what is on the bike is standard bolt-on stuff. It's the time that really "costs" you. I have spent a lot of time doing research, and still have a long ways to go. It's not just parts or $$ (although it takes both) that make the bike...it's finding the right combination.
Researching and working on the bike is really my hobby. Occasionally I ride it and try to go fast. 
Shane
|
Shane661
Needs a life
Posts: 11494
|
posted September 13, 2009 03:09 PM
quote:
Sorry Lyle, I sure didn't. If I decide to powder coat it, I'll get the weight next time and post it.
And thanks Shane!
I really think the red wheels compliment the arm nicely. Maybe some polishing of the chain guard to complete the look? Very nice...
|
LAB3

Needs a job
Posts: 2977
|
posted September 13, 2009 04:26 PM
Polish the outside rim and stop at the center lip on each side so the center of rim and spokes
are still Red. I like the swing arm James, I have the same Gold Links too and M14 exhaust
(Shanes old exhaust) Tressie has my email from the Amsoil oil I got from her. I will walk you
thru what we used to strip the paint off the wheels and not hurt paint you want to keep Red.
|
AcadianaZX
Advertiser
Posts: 530
|
posted September 13, 2009 05:43 PM
Thanks guys! I appreciate the tips. I was thinking some Gales Speed rims might be next. I will polish the chain gaurd now that you mention it Shane. Now how do I hide the rim polish thing from Tressie?(hehe!) She see's this, new rims are out of the question. Just a little humor LAB3. She knows I'm looking for cost effective weight saving for her pocket book. I keep showing her Shane rims, but she won't go there. I wish I would have weighted the swing arm now that it may not come off. I glad you guy's like it.
James
|
KSPZ3

Expert Class
Posts: 334
|
posted September 13, 2009 06:20 PM
Shane - Did you remap for the short stacks - specifically did you add fuel on the top....
Thanks - Kevin
|
Shane661
Needs a life
Posts: 11494
|
posted September 14, 2009 08:40 AM
quote:
Shane - Did you remap for the short stacks - specifically did you add fuel on the top....
Thanks - Kevin
Nope. I just left the map as-is. The Brock's Maxton map is a little fatter on top as it is. It could probably use some improvement for my combination.
|
gilberjj

Needs a job
Friend of Fast
Posts: 3196
|
posted September 15, 2009 01:57 PM
Shane, I've been dieting and restricting myself to 1000 calories a day. What was your diet that you used? I'm also just running a few miles a day. I'm 235 right now and I want to get back to 190-200ish.
Thanks
|
Shane661
Needs a life
Posts: 11494
|
posted September 15, 2009 01:59 PM
quote:
Shane, I've been dieting and restricting myself to 1000 calories a day. What was your diet that you used? I'm also just running a few miles a day. I'm 235 right now and I want to get back to 190-200ish.
Thanks
I just kept my calories to 1500 or less, no special diet. I ate lots of yogurt and lean cuisines.The biggest thing that helped me drop weight was eliminating sodas. I've fallen off that wagon and gained 10 lbs. back...
Damn you Dr. Pepper, damn you to hell!!

|
gilberjj
Needs a job
Friend of Fast
Posts: 3196
|
posted September 15, 2009 02:19 PM
quote:
quote:
Shane, I've been dieting and restricting myself to 1000 calories a day. What was your diet that you used? I'm also just running a few miles a day. I'm 235 right now and I want to get back to 190-200ish.
Thanks
I just kept my calories to 1500 or less, no special diet. I ate lots of yogurt and lean cuisines.The biggest thing that helped me drop weight was eliminating sodas. I've fallen off that wagon and gained 10 lbs. back...
Damn you Dr. Pepper, damn you to hell!!
Haha, thanks!
|
Fastest-14

Expert Class
Fastest -14
Posts: 354
|
posted September 15, 2009 05:10 PM
Shane, didn't you or someone else do a full detailed picture illustration, explanation on how to change the stock velocity stacks to the Muzzy or Factory Pro stacks? I remembered seeing it here somewhere but my searching ain't to good sometimes.
|
Fastest-14
Expert Class
Fastest -14
Posts: 354
|
posted September 15, 2009 05:10 PM
Shane, didn't you or someone else do a full detailed picture illustration, explanation on how to change the stock velocity stacks to the Muzzy or Factory Pro stacks? I remembered seeing it here somewhere but my searching ain't to good sometimes.
|
Shane661
Needs a life
Posts: 11494
|
posted September 15, 2009 05:20 PM
Edited By: Shane661 on 16 Sep 2009 01:21
quote:
Shane, didn't you or someone else do a full detailed picture illustration, explanation on how to change the stock velocity stacks to the Muzzy or Factory Pro stacks? I remembered seeing it here somewhere but my searching ain't to good sometimes.
Page 45:
http://www.bikeland.org/board/viewthread.php?FID=27&TID=40269&pagenumber=45
Also, Ninjaboy311 (Pat) did one quite awhile back.
|
JR

Expert Class
drag racing
Posts: 178
|
posted September 15, 2009 05:54 PM
shane thanks a million i pulled the pan like you said and got the screw out real easy. now i need some of those screws im gonna check auto zone tommorow. do you know the torqe setting for the oil pan .
____________
08 zx 14 lowered, straped in the
front, strecth 65, air shifter, pigs
windshiel, carbon fiber frame
sliders, full 2brother exhaust.

|
Fastest-14
Expert Class
Fastest -14
Posts: 354
|
posted September 15, 2009 06:00 PM
Shane thanks a bunch!!!
|
Shane661
Needs a life
Posts: 11494
|
posted September 16, 2009 06:39 AM
quote:
shane thanks a million i pulled the pan like you said and got the screw out real easy. now i need some of those screws im gonna check auto zone tommorow. do you know the torqe setting for the oil pan .
I don't know the setting right off. You should buy or download a service manual. Make sure you get metric bolts of the proper thread pitch.
Shane
|
kawasakijockey

Pro
Posts: 1876
|
posted September 16, 2009 07:32 AM
quote:
shane thanks a million i pulled the pan like you said and got the screw out real easy. now i need some of those screws im gonna check auto zone tommorow. do you know the torqe setting for the oil pan .
Oil pan bolts torque to 87 in lbs which is 7.25 ft lbs.
____________
Get on the shortbus boys 'cause its time to get schooled.
2007 ZX-14
1.38 60ft
9.03 @ 149mph
8.95 @153 small shot n2o
8.68 @160mph 5lbs boost
|
Fastest-14
Expert Class
Fastest -14
Posts: 354
|
posted September 18, 2009 11:08 AM
Shane, I'm getting ready to install the velocity stacks today. I read, pg 45. After you got the tank off and the side panels, what other tools did you need and were the bolts that hold the clamp already staggered or did you have to stagger them yourself?
|
Shane661
Needs a life
Posts: 11494
|
posted September 18, 2009 11:17 AM
Edited By: Shane661 on 18 Sep 2009 19:18
quote:
Shane, I'm getting ready to install the velocity stacks today. I read, pg 45. After you got the tank off and the side panels, what other tools did you need and were the bolts that hold the clamp already staggered or did you have to stagger them yourself?
From what I recall, I used a 10mm socket to remove the inspection plates. Then you will need an allen wrench (I forget the size) to remove the clamps holding the rubber boots.
You will need to stagger the clamps when you reinstall them; they are not staggered as installed from the factory.
Shane
|
Shane661
Needs a life
Posts: 11494
|
posted September 18, 2009 11:44 AM
Edited By: Shane661 on 18 Sep 2009 19:59
A few days back I installed the 3 hole links. I wasn't quite happy with the way the bike was sitting, it just seemed too low. Combined with my lowered shock, I was looking at something like a 4" drop.
At the same time, I didn't want to go back to the heavy threaded links. So, I started looking around for a product that would be light and fully adjustable. I found that the Brock's "Window Links" were advertised at 14.1 ounces for the pair. If that light, they would be even lighter than the 3 hole links I had installed. I ordered a set to try:

Lowering links are not a super-technical product. So, I'll just break down the basics of the three types I have here. :
Spencer Cycle Threaded Links:

Price: $119.99
Pros: Very strong, fully adjustable
Cons: Heavy
Brock's 3-Hole Links:

Price: $69.95
Pros: Light, Strong, Cheap
Cons: Limited range of adjustability
Brock's Window Links:

Price: $184.95
Pros: Strong, fully adjustable, light
Cons: Costly
Basically, you get what you pay for with these links. The Spencer Cycle links are very strong and adjustable...but also very heavy. The Brock's 3-Hole are cheapest, but limit your ride height options. The Brock's Window Links have the best of both worlds..fully adjustable and even lighter than the 3-hole links...but they are also the most expensive.
As you can see above, the Window Links weighed in at only 7.5 ounces each. That is pretty close to the claim of 14.1 ounces per pair, and well within the range of error for a $30 scale. Since they are called "Window Links", what is that all about? Well, in the ends of the links there are little windows which allow you to verify that you have a safe amount of the threaded rod on each side of the link. The links are also marked as to which direction to turn for adjustment, as shown:


That is actually a pretty nice detail.
So, that about sums up my lowering link tech article. Now I just need to find my stock bolts so that I can mount them up.
Shane
|
Fastest-14
Expert Class
Fastest -14
Posts: 354
|
posted September 18, 2009 01:02 PM
From what I recall, I used a 10mm socket to remove the inspection plates. Then you will need an allen wrench (I forget the size) to remove the clamps holding the rubber boots.
Shane
Never heard of the inspection plates. Where exactly wud they be located?
|
|
|
 HOME
HOME NEW TOPIC