quote:
Sorry for the lesson, but i'm looking forward to seeing you achive your goal and it just seems a shame that the food temptation might prevent you from doing it.
Watch the energy intake. Energy in and not used gets stored = excess weight.
Good luck with the build of the 14 over the next few weeks.
I'll make my goal. I know myself pretty well, and I know exactly why I didn't make weight. Not so much a food craving...I eat when stressed, and I have been very stressed in the past week or so.
Regarding water loss, when I diet I temendously increase my water intake. My typical caloric intake, per day, is 1200-1400 calories. Occasionally I will push a little harder, but I'm not trying to go crazy, I have time.
Anyway, thanks for your input. Let's see what 5/13 brings.
posted April 16, 2009 10:29 AM
Shane,
What does zx14 lock down mean?
Does the valve stack lock closed at a specific pressure, rate of compression, or distance in travel?
____________
natural selection.....
destiny will overcome intervention.
Some are not worthy of the effort.
quote:Shane..... I'm guessing you are going to go turbo at some time. Why don't you just take the plunge now and save yourself a LOT of time and money?
I'm really out of money for for those big expenses...maybe next winter?
posted April 16, 2009 01:45 PM
Edited By: Shane661 on 16 Apr 2009 21:46
I wanted to install some new tire on the BST's today. I set the rear tire out in the sun to get hot, and mounted the rim in the changer:
No dice! I couldn't even get the first bead of the tire over the lip! Plus it made a horrible screeching sound as I tried to push it down over the lip (I think a little pee ran down my leg when I heard it).
You are not supposed to use much lurbricant because the rims are slick and they can spin in the tire. But even with some soapy water, I couldn't get it. The rim lip is fairly sharp on the BST's, and it is just digging into the tire. Even using some pretty good force, it wouldn't go. Fortunately, the No Mar Tire Changer was true to it's name and left no marks. I have done about 8-10 swaps so far on aluminum rims with no troubles.
I will have to call Brock's tomorrow for some advice, or hopefully someone here will chime in.
posted April 16, 2009 04:12 PM
A few more things done Pegs and foot controls reinstalled, air shifter linkage hooked up. Quick access clutch cover and new gasket installed:
I decided to keep the clutch cover on for now. This bike is going to be like a test mule for awhile, and this will make it easy to try different clutch setups. I've also found that I didn't do a good job of segregating fasteners; I am missing some bolts and circlips. What you think you will remember and what you actually do remember...well, after 5 months they don't agree.
posted April 16, 2009 04:49 PM
did you see the new busa fender that schnitz was advertising a couple of days ago?
____________
Best 60ft: 1.42
Best 1/8th: 5.97
Best 1/8th MPH: 119
posted April 16, 2009 04:52 PM
Edited By: Shane661 on 17 Apr 2009 00:52
Yeah, I saw it. I know Guy Caputo (Tiger Racing), he is a Maxton regular. I'm going to look at it in person before I consider it....
posted April 16, 2009 05:18 PM
what bolts are you missing, i have a lot of extra things laying around.
____________
b.w.
zx14, little longer, little louder, little lower.
08 Busa, just a little longer and louder and lower than the 14
posted April 16, 2009 05:19 PM
also with an arm that long, if you have an 06-07 are you worried about the fuel pump hitting the swing arm?
____________
b.w.
zx14, little longer, little louder, little lower.
08 Busa, just a little longer and louder and lower than the 14
posted April 16, 2009 05:27 PM
nice, that will solve the problem of the pump hitting too
____________
b.w.
zx14, little longer, little louder, little lower.
08 Busa, just a little longer and louder and lower than the 14
posted April 16, 2009 08:45 PM
Anyone got an extra set of bolts for the clipons? My bike came with helibar risers on it and no stock bolts lol.
____________
Best 60ft: 1.42
Best 1/8th: 5.97
Best 1/8th MPH: 119
posted April 17, 2009 09:21 AM
Edited By: Shane661 on 17 Apr 2009 17:23
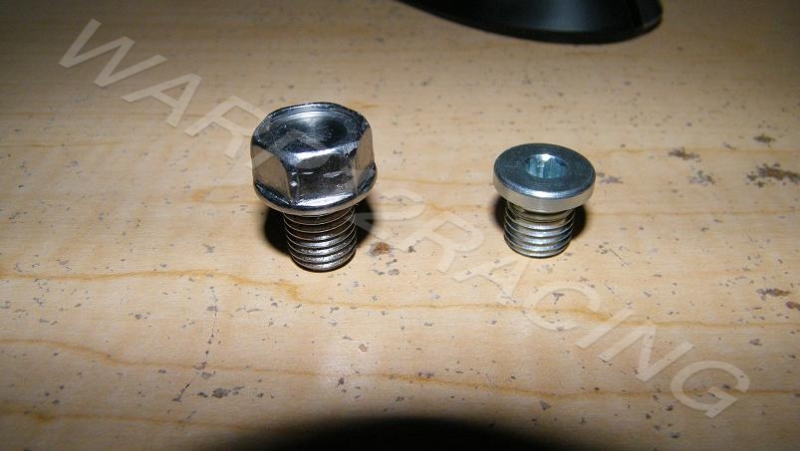
Ok, so I finally got around to modifying my oil pan for clearance. I had considered a Clem's pan. However, when I called they couldn't assure me that it wouldn't run low during top speed passes at the mile (1 mile+ wide open). I inquired about what the actual oil level was in the sump while running, and they didn't know. They referred me to Greg (ZX14.net) at HPC. I've never seen Greg show up to the track without bike problems, so I decided to modify my pan and keep the factory level intact.
The first step was finding a new drain plug:
I then used a dremel and flat file to remove the guard, bringing it down to a point a little below my new drain bolt:
I also compared three different drain plug washers. OEM, Autozone copper, and one from the Honda shop:
I took a variety of measurements. The copper washer was thinnnest, by .5 mm. The other two were very close, near 2.0 mm. The ID of the OEM was right at 12mm, Honda 12.3, and copper was 12.75. To make a long story short, the OEM was best overall...and here is why:
See the mark from the bolt, on the gasket surfaces? The OEM has the best sealing of the three...the copper is really iffy, imo. The Honda shop part should work fine, but I really like the way the oem seals.
So, that's it. Overall I think this is a decent compromise, without any worries of changing the oiling system from stock. If anyone has a picture of the unmolested stock setup with guard, please post it up for comparison. Better yet, if someone can measure the height from the pan to the tip of the guard, that would be awesome. Thanks.
Shane
PS. If anyone is interested in a modified pan like this, let me know. Depending on interest, I may pick up a couple of spares to keep around. I know that not everyone has the tools to do this job. Email Shane at warp12racing dot com.
posted April 17, 2009 12:21 PM
Edited By: Shane661 on 17 Apr 2009 20:54
Got the pan reinstalled with new gasket and oil filter. Here you can see how much clearance has been improved:
I'm starting to see a glimmer of hope. If I get my modified brake hanger and new axle blocks in time, I may just turn a wheel at the track next week.
posted April 17, 2009 04:04 PM
Edited By: Shane661 on 18 Apr 2009 00:05
As I said earlier, I needed to remove the master link from the chain, in order to route it through the swingarm. I use a clip type link with a DRZ-2 non o-ring drag racing chain. I figured it would be a good time to inspect the condition of the pins..
Here you can see that the lubicant has penetrated the chain very well. This lube has been on the chain since my last track day in the beginning of November.
Cleaning away the lubricant, I can inspect the pins for wear:
Very, very little wear. The chain has about 75 track passes on it, 7 top speed runs at Maxton, and about 500 miles overall. I clean and lubricate the chain often (probably no less than once every 10-12 passes at the track, I seem to recall). I use WD40 to clean it, and I lube it with this Honda brand product:
This product penetrates well, with not too much fling, and does not get sticky. Again, keep in mind that my routine is for a non o-ring chain and will not apply to your typical street chain.
posted April 18, 2009 11:25 AM
Edited By: Shane661 on 18 Apr 2009 20:03
I'm installing the new Brock'sexhuast today.
A few dabs of grease to hold the new exhaust gaskets in place. I put the "seam" of the gasket face down so that the exhaust spigots don't spread or split it. Just my preference:
I'm not going to bore you with a bunch of details. The exhaust went on great, with no leaks, the first time out. I skipped the rtv for my install...I'm just going to keep an eye on it for now.
Installed pictures:
All the clearances look great. It is a tight, good, fit. You can also see that my drain plug is equal or a little higher than the exhaust sits. I also wanted to test my tiny Odyssey 310 battery. There was some quesiton of whether it would have enough juice to crank over the 14. I'm happy to say it was fine...even after sitting for near 5 months. My stock battery was dead as a door nail.
Here is a video so you can hear how strong the Odyssey cranks over, and also the new exhaust. I kept it tame, no more than 5k rpm...so you can get an idea of what it will sound like normally:
Sorry for the shaky camera...but I had to keep the rear wheel from rotating around...none of that stuff is tightened down yet. Also, just an FYI...if you ever do something dumb like hook your battery up backwards, it will pop the 30 amp main fuse quite audibly.
 HOME
HOME NEW TOPIC