Lucky14

Pro
Posts: 1439
|
 posted May 28, 2012 03:56 PM
 Edited By: Lucky14 on 29 May 2012 00:00 Edited By: Lucky14 on 29 May 2012 00:00
How To: DIY Air Shifter
I got this from Wheelie and he got it from Rich Craft 1. Before that – I don’t know! If anyone sees something wrong with the procedure, please jump in!!!
All you need is a little background in basic tools, electrical wiring, and “plumbing.” It’s not cheap, but it is a good solid system that uses quality components. We chose Nitrous because it is always available at the track and a 1 lb. bottle is good for hundreds of shifts. You could also use CO2 or an on-board compressor or even the original – air!
If you have an Ace Hardware, you can pick up all of the following for the Ram mount in one place:
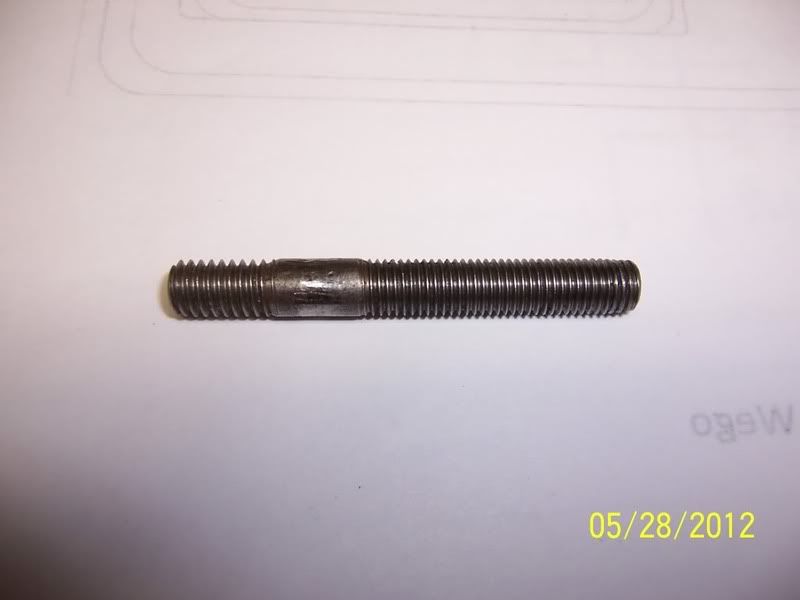
Stud 5/16" x 2.5" Ace Hardware (1.5" fine thread, 0.5" shoulder, 0.5" coarse thread)
Drill bit – 9/32
Tap 5/16 x 24 (fine thread)
1" spacer – chrome, 5/16”
5/16" Jam nut (2) – these are thinner than a regular nut and allow for more threads into the motor mount
Acorn nut – chrome
5/16” clevis and ¼” clevis pin (to mount to the shift lever).
Here is the stud (carburetor stud, I believe) (Note that one end is fine thread and the other is coarse):
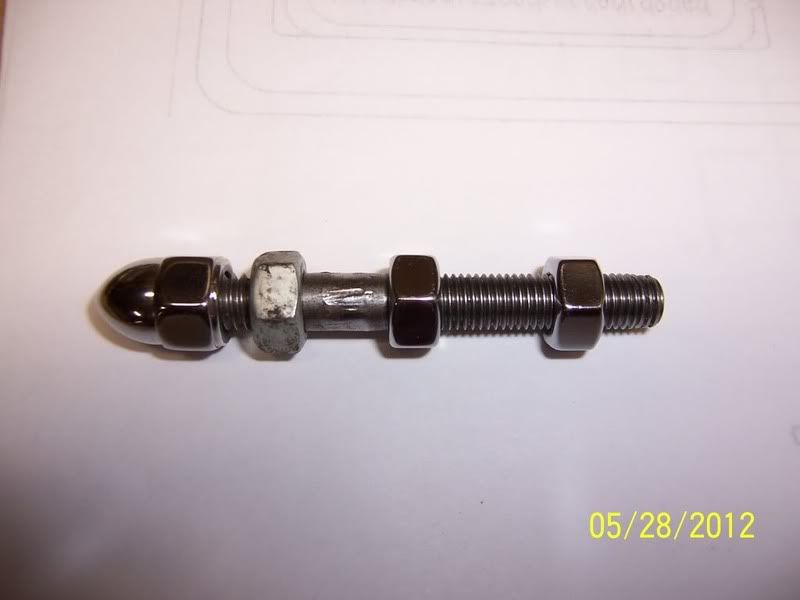
Here is the stud mocked up (without the 1” spacer that would be between the jam nuts (also showing only regular nuts, ‘cause that’s all I had handy). Excuse the old hardware, but you get the idea:
____________
You only need two tools: WD-40 and Duct Tape.
If it doesn't move and should, use the WD-40.
If it shouldn't move and does, use the duct tape.
  
|
Lucky14
Pro
Posts: 1439
|
posted May 28, 2012 03:57 PM
The motor mount is already hollow, so you are just drilling it out slightly bigger to be able to tap it to 5/16 x 24 (fine thread). The book calls for a drill size of Letter “I” (0.272) but unless you own a machine shop, a 9/32 (0.281) drill bit will work fine. Drill and tap to ¾ inch deep will be plenty as the stud will only have about 10 – 12 threads at most into the mount. You can do this in place, but if you are comfortable with removing and replacing the mount, you will see that it is somewhat “pointed” and if you grind it flat, it will provide a more solid mount. On final assembly, use thread locker to insure that the stud stays in place.
The order of assembly for the top mount is to thread the first jam nut to the shoulder, add the spacer, then the other jam nut. Check to see how many threads are left. If memory serves, I only had 6 or 8 threads, and I wanted more, so I ground off a small amount from the back side of the chrome spacer to get me 10 – 12 threads. Next double nut the coarse thread end, put thread locker on the fine thread end, then tighten into the engine mount.
Assembled, it looks like this:
____________
You only need two tools: WD-40 and Duct Tape.
If it doesn't move and should, use the WD-40.
If it shouldn't move and does, use the duct tape.
|
Lucky14
Pro
Posts: 1439
|
posted May 28, 2012 03:57 PM
The Ram is now ready to mount. I assume that you already went to Grainger (Schnitz has the same parts, but the price is about double) and bought the following:
Air Cylinder 5ZEE4 (Must press out the pin in the top mount and drill to 5/16”)
Solenoid 6JJ52
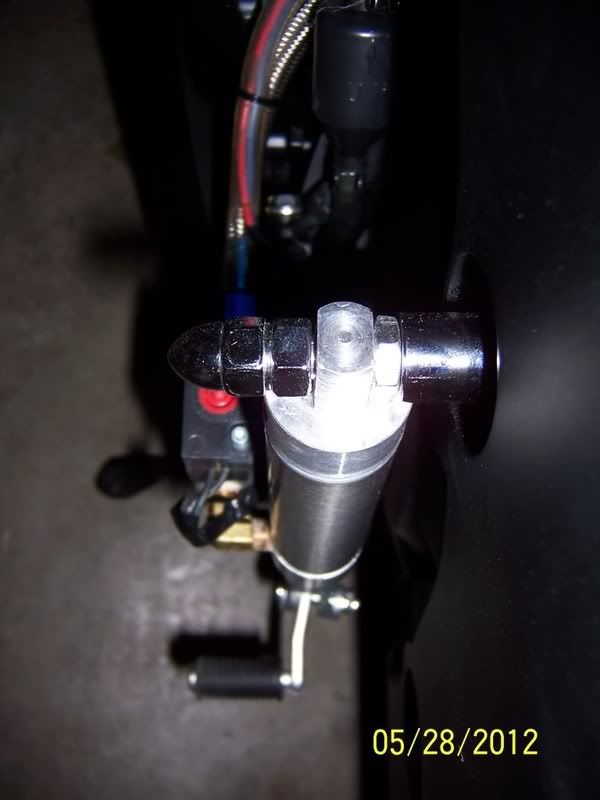
Thread the clevis on the bottom shaft of the Ram and hang the Ram on the top mount and add a nut so it doesn’t fall off. The critical thing at this point is to have the shaft at its midpoint of travel exactly lined up with the arm of the shift lever so there is no binding in either the up or down direction. My clevis was too long to allow this, so I had to cut it off, but buying a proper length clevis in the first place would work also. The clevis is 5/16’ but I used a ¼ ‘ clevis rod to go through the hole drilled in the shift lever to avoid any binding. The hole should be drilled at a point that keeps the Ram near-vertical.
The end result, in my case, looks like this:

____________
You only need two tools: WD-40 and Duct Tape.
If it doesn't move and should, use the WD-40.
If it shouldn't move and does, use the duct tape.
|
Lucky14
Pro
Posts: 1439
|
posted May 28, 2012 03:58 PM
The rest of the install is a matter of wiring and plumbing, depending on your choice of “air” and electronics. The Carolina Cycle regulator (part # 12050) will serve well to step down Nitrous or CO2 to 125 or so psi.
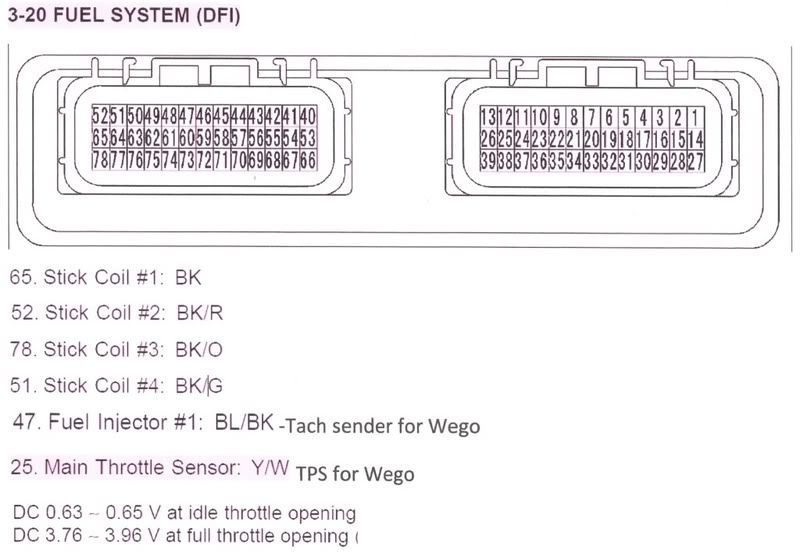
If you go with the MPS Autoshift box (1-0299) the following wires on the 2012 R model will be tapped in at the ECU as follows:
#1 blk
#2 blk/red tracer
#3 blk/orange tracer
#4 blk/green tracer
To make those wires easy to find, it will look like this:
On the 06 – 11 models, I believe that the wires are as follows, but confirm this by checking the shop manual:
#1 white/red
#2 white/blue
#3 white/green
#4 white/yellow
____________
You only need two tools: WD-40 and Duct Tape.
If it doesn't move and should, use the WD-40.
If it shouldn't move and does, use the duct tape.
|
Lucky14
Pro
Posts: 1439
|
posted May 28, 2012 03:59 PM
Finally, in my case, here is how it all fits under the seat:
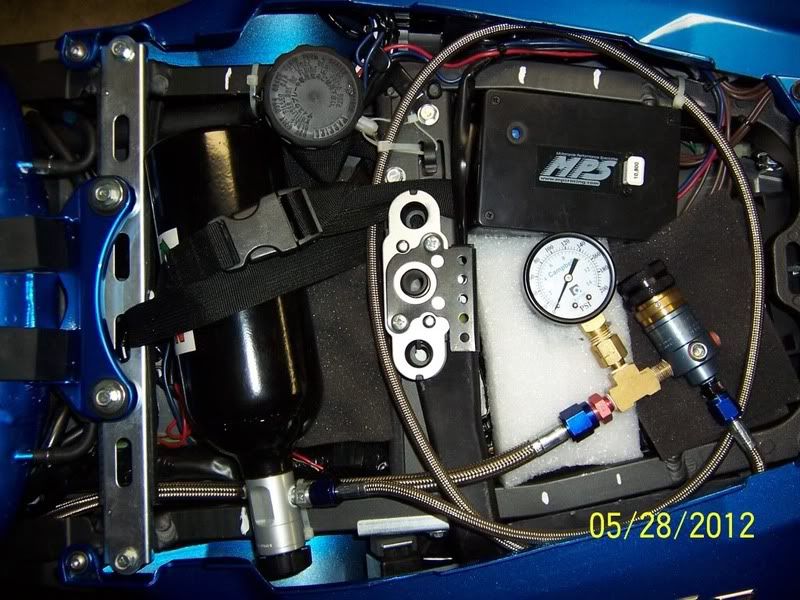
Hope this helps …………………………
____________
You only need two tools: WD-40 and Duct Tape.
If it doesn't move and should, use the WD-40.
If it shouldn't move and does, use the duct tape.
|
Seno

Pro
BANNED FOR LIFE!
Posts: 1230
|
posted May 28, 2012 04:18 PM
Awesome write up! Well done.
____________
2012 Black 14R -> Completely done!
|
Shane661

Needs a life
Posts: 11494
|
posted May 28, 2012 04:24 PM
Very nice! 
|
smokinZX14

Needs a life
Posts: 10197
|
posted May 28, 2012 04:28 PM
Edited By: smokinZX14 on 29 May 2012 02:19
Very nice lucky .. For some reason unknow to me at this point i have to run 150 PSI to the ram or the damn thing will miss 3 gear everytime ... Now i say 150 PSI BUT i have a cheap assed Gauge from MRE that could be way off .. I need a nicer gauge like yours to know for sure ..
 I have proof , the blue ones are the fastest .. I have proof , the blue ones are the fastest .. 
____________
Smokin Performance Cycles..
Tampa Bay , FL .. Brocks Performance Dealer ..
Gen 2 ZX14R Best ET 8.43 , Best MPH 164.95
|
edszx14
Expert Class
Posts: 271
|
posted May 28, 2012 05:43 PM
Hey Lucky, very nicely done. I still love that blue color. See you at the track soon.
____________
Ed
|
smokinZX14
Needs a life
Posts: 10197
|
posted May 28, 2012 06:21 PM
quote:
Hey Lucky, very nicely done. I still love that blue color. See you at the track soon.
I have proof , the blue ones are the fastest ..
____________
Smokin Performance Cycles..
Tampa Bay , FL .. Brocks Performance Dealer ..
Gen 2 ZX14R Best ET 8.43 , Best MPH 164.95
|
entropy
Moderator
Posts: 8671
|
posted May 28, 2012 06:54 PM
nice write up!
where did you get the lil Ashcroft gauge on yr steering stem?
____________
This moderator uses moderation in moderation
|
Lucky14
Pro
Posts: 1439
|
posted May 28, 2012 07:17 PM
Edited By: Lucky14 on 29 May 2012 03:17
I promised this to a couple of people awhile back, but finally got around to doing it.
It was more work than I thought it would be, and all I could think of was Shane's gazillion page Build Thread and how no one could imagine how much work went into THAT........
____________
You only need two tools: WD-40 and Duct Tape.
If it doesn't move and should, use the WD-40.
If it shouldn't move and does, use the duct tape.
|
smokinZX14
Needs a life
Posts: 10197
|
posted May 28, 2012 07:30 PM
Edited By: smokinZX14 on 29 May 2012 03:31
quote:
nice write up!
where did you get the lil Ashcroft gauge on yr steering stem?
That not his gauge , that is my bike and gauge set up .. That came from MRE .. But i think its readings are off ..
____________
Smokin Performance Cycles..
Tampa Bay , FL .. Brocks Performance Dealer ..
Gen 2 ZX14R Best ET 8.43 , Best MPH 164.95
|
entropy
Moderator
Posts: 8671
|
posted May 28, 2012 08:00 PM
smokin,
sorry about the confusion.
Ashcroft is known for making 1st class gauges; does MRE have it on their site?
____________
This moderator uses moderation in moderation
|
KoflaOlivieri

Expert Class
Posts: 298
|
posted May 28, 2012 09:31 PM
Very nice, thanks for sharing!
____________
Riding My Own Biography: (MotoVlog)
2010 Kawasaki ZX-14
1985 Yamaha V-Max 1200
1977 Kawasaki KZ 1000
1975 Kawasaki Z1 900
1974 Kawasaki H2 750
1972 Kawasaki H2 750

|
Bently
Needs a life
2012 14r In Blue and no Mods!
Posts: 5428
|
posted May 29, 2012 05:19 AM
quote:
Very nice lucky .. For some reason unknow to me at this point i have to run 150 PSI to the ram or the damn thing will miss 3 gear everytime ... Now i say 150 PSI BUT i have a cheap assed Gauge from MRE that could be way off .. I need a nicer gauge like yours to know for sure ..
I have proof , the blue ones are the fastest ..
lee on all my 14s i needed to be around 140 to 150 or had issues as well
|
eklipse636

Needs a life
ZX-14
Posts: 6046
|
posted June 03, 2012 04:42 PM
quote:
quote:
Very nice lucky .. For some reason unknow to me at this point i have to run 150 PSI to the ram or the damn thing will miss 3 gear everytime ... Now i say 150 PSI BUT i have a cheap assed Gauge from MRE that could be way off .. I need a nicer gauge like yours to know for sure ..
I have proof , the blue ones are the fastest ..
lee on all my 14s i needed to be around 140 to 150 or had issues as well
I hear a lot of people say they only Pump it up to 120, but I have always done 150 and it works great
____________
Best: 60ft 1.351 1/8 5.68 mph 123.98 1/4
8.89 mph 151.32
|
RICH CRAFT 1

Zone Head
Posts: 681
|
posted June 19, 2012 09:22 AM
Edited By: RICH CRAFT 1 on 19 Jun 2012 17:24
Lucky, I don't know how i miss this thread, but I've been really busy lately. This is a excellent write up for those guys who like to do it themselves. A couple of things I would like to add, The clevis pen should be a quarter inch instead of 5/16. It is shorter and allows you to put a jam nut at the top. use the same drill and tap you used on the motor mount to drill and tap the quarter inch clevis to the same 5/16 that is on your air shifter RAM. Be careful when drill the motor mount out to the Size for the tap to keep the drill bit aligned with the whole that is their, I let one I did get crooked. So when you start tapping the whole the tap wants to go crooked also and will not allow you to go as deep as you want.
For the guys that are thinking about going with nitrous, you are going to need a timing retard, the SB-6 is a excellent choice. I'm not sure if it's available for the 14R yet, it has a data logger it uses a differ MPS auto shift box. it's considerably cheaper than the other one, a lot more adjustable and does not back fire in between shifts. the only downside to this set up is you have to turn the shifter off with a toggle switch, because when you turn the key back on. It will shift the shifter. I've been using this setup for about four years and would not take for it dollars for dollar>
Ken
____________
Red 06 ZX14 RR
|
RICH CRAFT 1
Zone Head
Posts: 681
|
posted June 19, 2012 09:37 AM
Edited By: RICH CRAFT 1 on 19 Jun 2012 17:39
I forgot to add about the air pressure. I also use about 150 PSI. I used to think because the bike missed a gear. It was because of low air pressure or something wrong in my transmission, in my case it was neither, if the 14 spans It will not shift. it wasn't until I got the data logger SB-6 or wego 3 and could see actual wheelspin that I realized this. The 14 has one of the strongest transmissions out there, but it doesn't like wheelspin. usually what happens at the top of second or third year when the motor is making maximum horsepower. It will spin the wheel, then it won't shift into the next gear, making you think it missed a gear, I guess you could call it that. But really it's the wheel spin that caused it.
Ken
____________
Red 06 ZX14 RR
|
Wheelie

Needs a life
Old Man
Posts: 6902
|
posted June 19, 2012 11:59 AM
I think my solenoid said 120 max, but I'm not certain, btw mine is set at 150 hehe
wee
|
Lucky14
Pro
Posts: 1439
|
posted June 19, 2012 12:16 PM
I just noticed an error!!!
There is NO jam nut between the spacer and the motor mount.
If only we had a moderator that could edit my original post .......
____________
You only need two tools: WD-40 and Duct Tape.
If it doesn't move and should, use the WD-40.
If it shouldn't move and does, use the duct tape.
|
boostphreak
Expert Class
Posts: 168
|
posted December 18, 2012 11:25 AM
Or get a boostbysmith shift light with the auto shift option. takes up less room and its cheaper
|
cliffrandall
Zone Head
Posts: 757
|
posted December 18, 2012 03:36 PM
Get a set of hard bags and hide all that shit......Pic of a proper shifter set-up. A little milling and you're all set.
Cliff

|
Wheelie
Needs a life
Old Man
Posts: 6902
|
posted December 18, 2012 03:40 PM
quote:
Get a set of hard bags and hide all that shit......Pic of a proper shifter set-up. A little milling and you're all set.
Cliff
Anyone notice anything in this "proper" shifter setup?
wee
|
cliffrandall
Zone Head
Posts: 757
|
posted December 18, 2012 03:45 PM
What do you see Wee, did we miss something?
Cliff
|
|
|
 HOME
HOME NEW TOPIC

